Using Delay Effects for Sound Design
The ability to use delay effects effectively is a core skill to include in your producer skill-stack. Read on to find out what you need to know and a few things that are nice to know about using delay like a pro!
What is delay in music production?
Delay is an effect process that takes incoming signals and plays back delayed duplicates to simulate the sound of echoes.
An echo occurs in real-world acoustic spaces where the reflection surface is far enough away from the sound source and listener to make the reflection sound like a distinct separated repeat or tap of the original sound. This can be heard for example when you scream something into a well.
Two identical sounds, when played in rapid succession with a delay between them of 1ms to 50ms, will appear as one fused sound to a listener. Any delay time longer than this will start to sound more like a distinct echo.
Reverb, flange and chorus effects are all delay-based effects where the delay parameters are adjusted or the signal modulated to create different-sounding end results to that of a straight delay effect.
What is the purpose of delay?
Musicians use delays creatively as part of their playing and performance.
Audio engineers and music producers use delay to create a sense of space and depth in a mix. It can also be used to add more tone and character to instruments or vocals.

How does delay work?
Delay effects work the same in terms of function, even though the form or tech differs between the types of delays.
The delay effect is created by recording or buffering the signal and then playing back repeats of the signal at later points in time.
Different types of delay effects will have differences in the way the repeats or delay tails are modulated.
What are the types of delays used in music production?
1. Software Plugins
In today’s home studio you’ll deal mostly with software plugins for your day-to-day music production needs.
These plugins, just like with compressor & equalizer plugins can be sorted into those which emulate older classic hardware delays and those that don’t.

2. Tape & Analog Delay
Software delay emulations usually aim to recreate the hardware delays of yesteryear. Engineers used tape machines to create delay effects at first back in the 1950s.


3. Digital Delay
Analog delays were followed by digital delays which became available from the late 1970’s onward, first as outboard units like the AMS DMX 15-80S and a bit later as pedals such as the BOSS DD-2 in the earlier half of the 1980’s and others like the later cult classic, Ibanez DE7 to mention a few.
These types of delays use digital signal processing electronics to create the delay effect and are still popular today as both pedals and studio rack units.

ㅤ
Where do you put delay in a signal chain?
Short answer: Anywhere you please!
Seriously, like most things in music production and mixing, there aren't any hard and fast rules with delay effects.
That said, there are some standard practices which are standard for good reason.
Delay, in most cases is best inserted as a send effect, in parallel with your dry signal, rather than in series as an insert. This just gives you more control over the blend. It also opens up a whole world of processing possibilities as you can process your send channel separately to add modulation, distortion, EQ or compression to only your wet signal.
Of course there are times where you'll use delay as an insert but this simply means every plugin you insert after your delay will process your wet and dry signals together. Less control!
In terms of where to place delay relative to other effects in your chain:
This depends on what you're trying to do. Again, no hard and fast rules.
Delay usually works better before reverb because when you feed reverb into a delay you're delaying your reverb which can get real messy real fast.
Compressor before or after the delay? Place it before and you affect the sound going into the delay. Place it after and you'll affect what comes out the delay. So, if you want to change the dynamics of the wet delay signal or delay tail then place it after.
If you want the sound going into the delay to hit the delay more steadily then place your compressor before the delay. No reason to not do both if that works for you though!
In fact, this is a good way to think of any signal chain order for your effects. Which signal do you want to affect and where? Do you want to process what goes in to or what comes out of your delay? Try one way and then the other. Hear what works. Keep it and on to the next thing!
Basic Delay Effects Parameters Explained:
Tempo or BPM
Sets the tempo that the delay unit or plugin works at. You usually match the tempo of the DAW project but this is not law.
Tap Tempo
Many delay units or plugins allow you to tap in a tempo using a pad controller or your mouse button.
Dry/Wet or Mix
Sets the ratio between the dry original signal and the wet delayed signal. Set this to 100% wet and you hear only the delay signal. Set it to 100% dry and you hear only the original signal.
Delay Time
This sets the time between the separate distinct successive repeats.
Most plugins allow you set this control to synced or not synced. Synced will allow to change the delay time to a musical note length for example 8th note or 16th note, dependent of course on your tempo setting. With sync turned off you can set the delay time in milliseconds, for example 111ms.
Feedback
Controls how many repeats will be played after the original sound. This allows you to set the length of your delay tail. Each delay is a bit lower in level until it drops into silence after the last delay.
A feedback setting of 100% means each tap will be as loud as the next and will continue repeating until you lower the feedback setting. A 50% feedback means each tap will be half the level of the tap before it until the taps fall into silence.
See the images below for a basic mono delay feedback diagram and an example of a 50% delay feedback.

Classic Must-Know Delay Techniques:
Slap-Back Delay:
This technique stretches way back in time! Made popular in the 50s and 60s and used often on vocals and guitars.
Set your delay time to between 70ms and 120ms. Listen to the way it complements your dry sound. Blend the two together until it sounds good and musical.
Doubling Delay:
Pretty much a slap-back delay with a shorter delay time and some processing on the wet signal. Try between 20ms and 50ms.
The idea here is to create an artificial double-track from one take or sound.
Ping-Pong Delay:
Ping-pong delay is a dual delay effect that creates a call-and-response dynamic between the two taps of the delay.
One channel, for example, might have a delay time of 300ms and the other 600ms.
Techniques that use ping-pong delay are great for creating a sense of space and movement in your mixes.
Stereo Widening-Thickening Delay:
Two similar signals, when played back, one from the left speaker and the other from the right, with a very short delay between them, say 11ms-ish, will register as one sound to the listener. The effect is that this "one sound" will appear spread out more in the stereo field. How wide depends on the pan settings you have for each channel.
Now, add a bit of processing, like pitch-shifting the one channel down or up a few cents, and you start to get a subtle chorus-like effect which effectively thickens the overall sound.
How to Use Delay Like a Pro:
1. The Short & Long of It:
Short delays of under 100ms tend to blend with and smear the edges of the original dry sound. This can make the original sound appear larger as the delay doesn’t appear as a distinct separate echo but rather merges with the dry sound.
This idea lays at the basis for techniques like the Haas stereo trick and old-school classics like doubling and slap-back.
Longer delays tend to be used for groove, texture and the creation of a sense of space in the mix.
These types of delays can be great for keeping the interest of the listener and for filling empty spaces in your mix without using space-greedy reverb.
2. Mind Your Math:
Music is emotion, yes. It however becomes math when we analyze and work on it. So, at times it helps to get a bit mathematical about it.
You can set more exact delay, reverb and even compressor attack and release times when you know the standard note lengths of your track in milliseconds.
You can work out exact note lengths from your tempo or BPM setting with the use of a calculator. Just Google "BPM Delay Calculator" whenever you need to convert. Saves you having to run through this little calculation:
60,000 ms / Tempo (BPM) = Delay Time in ms for one quarter note
Much quicker to just use an online calculator that gives you all the note lengths, including dotted notes and triplets.
3. Connect the Dots:
Stabs and single hits can benefit from synced delays. Let’s say you’ve placed a single one-shot orchestra hit on beat one of a 4, 8 or 16-bar section of your song. A synced delay that finishes its last delay tap just before the next occurrence will connect the separate occurrences of the hit for the listener.
The fade of level on each successive tap has the effect of drawing the listener into the mix and sets up their expectation for the next hit.
4. Generate Some Groove:
Delay can be used in many ways to create groove in your tracks. You can, for example, add an 8th or 16th note delay, straight, dotted or triplet, to a simple straight quarter-note hat to produce a more complex pattern.
Make it more subtle by only adding the delay to the last tick of the hat in every bar or every two bars.
This same trick can be used on other drums, vocals and other instruments.
5. Texture & Beds:
Delay effects with extreme feedback settings can be useful for creating beds, texture and other creative effects.
The trick here is to not just put the delay in your mix and leave it there. You could, but you would have to automate the feedback so things don’t get out of hand.
Instead, bounce down the effect to a separate track and then manipulate the delayed sound. You can reverse it, fade it in or out, place a side-chain compressor over it to make it pump with your kick as a trigger for the compressor.
This is a fun place to experiment with all your more exotic modulation tools like ring modulators, phasers, flangers and auto-pitch tools.
Place any of these or other effects before or after your delays to create weird and wonderful oddities. Automate different effects in and out of your delays to create a sense of movement and maintain interest.
The keyword here is controlled chaos. First you make the chaos, then you bounce it down and then you tame it with smart editing, automation, EQ and compression.
3 Great Delay Plugins:

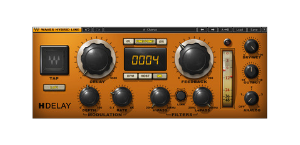
H-Delay by Waves
They call it a hybrid delay plugin. It is a reliable source of lots of fun in the studio. Definitely a staple for producers and well worth a spot in your plugins folder.

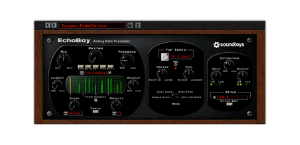
EchoBoy by Soundtoys
This beast of a delay plugin packs a serious punch in the studio. The Echoboy emulates classic delays and does so well but there's so much more you can do with this delay plugin to mangle your sounds. It's a keeper!

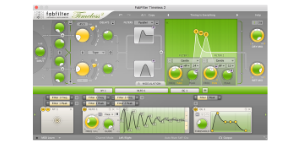
Timeless 2 by fabfilter
With its huge selection of presets and in-depth setting options, it is the perfect companion when it comes to sound design. You'll definitely get lost in the details you are able to generate.
